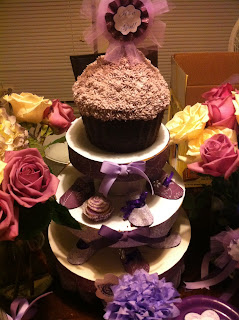
I've been seeing how-to's on making your own cupcake stand all over the internet. It's is so easy and cheap, especially when you really can't afford to dish out tons of $$$ for a glass one. During my baby shower I wanted everything personalized and I didn't want to glue ribbon on my glass one, so I jumped on the internet to see if there was a way to make one without busting the bank!! That is the cupacake stand I made for my baby shower on the picture!
I could not find the orginal site, but I found this one that is exactly the same on how to make your own cupcake stand:
http://www.hostessblog.com/2010/01/diy-tutorial-clever-dessertcake-stand/
All you need is:
3 round pieces of cardboard circles (different sizes)
3 unopened canned goods (2 small ones and 1 large one)
4 sheets of scrapbook paper
a ruler (I didn't use one I just eyeballed it)
Scissors or x-acto knife (I dont own one, but a box cutter will work too)
a cutting mat (I used a bunch of cardboard for a mat)
lots of glue (it can be a glue stick, glue gun, or even elmers glue)
* As you noticed I don't use a lot of the proper tools to do my projects.
When you can, IMPROVISE!! Well that is what I think Martha Stewart would say.
Instructions:
- If you don't want to spend extra money on the cardboard circles, you can make your own from an old box. I will tell you the box needs to be pretty thick. To trace the circle you can use a large plate to trace the larger circle. For the other two circles you can use a standard paper plate and a dessert plate. Use your scissors, box cutter, and if your fancy an x-acto knife to cut your circles out on top of your mat (or if your a cheapo, on top of another box). Cut the excess cardboard on the circles with your scissors.
- Once your cardboard circles are cut, place them on what ever style scrapbook paper you want the different layers to be. Trace on the back part of the paper (the non-designed part) and cut the template out. Glue the cut scrapbook sheet to the cardboard circle. I used a heavy duty glue stick that can be found down the scrapbook aisle.
- Now we need to cover the canned goods. What you thought they were for eating, well you thought wrong!! You will need to measure the size of the canned good and that is the height you want to cut your scrapbook paper. I would cut a long rectangle so you have enough to wrap around the cans. You can always cut the excess. Glue the paper to the can. Now no one will know that you don't eat your veggies!
- You'll noticed that you will have extra pieces of scrapbook paper after you cut your templates. Don't throw them away, we don't waste here!! Use the excess to make your trim around the cake stand. Cut 1-inch strips and glue around the edge of the circles. Repeat until the entire circles are covered with trim.
- Now glue your cans to the circles with a glue gun. If your scared and think you are going to mess up, figure out the circumference of your circle and you will find the middle. Well, I just eyeballed it and glued it to the middle of the back of the circle. I started with the largest can at the bottom and worked my way up. The smaller cans go in between the other two layers.
Tada!! You made a cheap and chic cupcake stand. No one will no its made out of cardboard, glue, and canned goods.

No comments:
Post a Comment